
Android Lifecycle Overview

As I ventured into the Android world as a Developer, one of the first things I had to understand was the lifecycle of an Android App.
It is a big paradigm shift from traditional Java programming. Typically a Java app has a single entry point and everything happens there after in a kind-of sequential manner. An Android App can have multiple entry points, and it can be interrupted by any reason, like a phone call suddenly coming in, a memory manager killing your app when it goes to the background or just because the user wants to open another app from a notification.
This is a new paradigm that implies having in consideration foreground lifecycles. These lifecycles are represented by a set of specific callbacks that will be executed by their classes according to the lifecycle moment it is in, meaning, when an Activity (Android Framework type class with a lifecycle) is instantiated it will go through override override override functions like onStart(), onResume(), onPause(), onStop(), onDestroy() throughout its lifecycle.
To better illustrate what the Android lifecycle is I have built a simple app that logs all the Activity and Fragment lifecycle events on the Logcat. You check it out here. Just clone the repository and then open it in Android Studio. Once you do that, just run it on a device and view all the lifecycle events being logged in the logcat console. To realise what happens, just try rotating your device and see the sequence of events in your logcat.
Activities
Activities are a single focused thing a user will do. Because of this, activities normally implement some sort of UI - through the method setContentView(layout) you can inflate your XML layout to the view.
As a user navigates through, out of, and back to your app, the Activity instances in your app transition through different states in their lifecycle.
The Activity class provides a number of callbacks that allow the activity to know that a state has changed: that the system is creating, stopping, or resuming an activity, or destroying the process in which the activity resides.
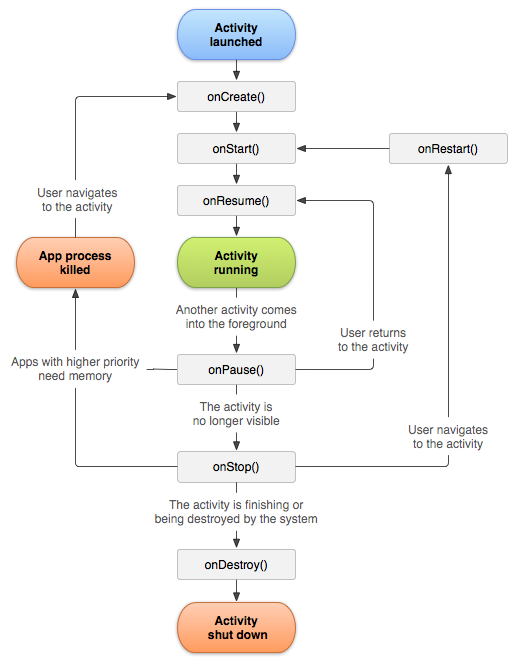
All the lifecycle callbacks are shown in the following code excerpt. All of these are hooks that you can override to do appropriate work when the activity changes state. Normally we do not override all of them, only the ones we really need for our use cases. You should make sure though that you save all the necessary information to rebuild your view when you do onPause() or onStop(). Meaning, you need to persist your ids or whatever information you need to ask your repository and rebuild your view on configuration changes (when you rotate screen for example). If you wanna see the activity lifecycle in action, create a new project and create a new Activity called “MainActivity.kt” like bellow:
class MainActivity : AppCompatActivity() {

    private fun printLog(s:String) {
        // display a message in Logcat
        Log.e("Activity Lifecycle:", s)
    }

    override fun onCreate(savedInstanceState: Bundle?) {
        super.onCreate(savedInstanceState)
        setContentView(R.layout.activity_main)
        printLog("onCreate Called")
    }

    override fun onStart() {
        super.onStart()
        printLog("onStart Called")
    }

    override fun onRestart() {
        super.onRestart()
        printLog("onRestart Called")
    }

    override fun onResume(){
        super.onResume()
        printLog("onResume Called")
    }

    override fun onPause() {
        super.onPause()
        printLog("onPause Called")
    }

    override fun onStop() {
        super.onStop()
        printLog("onStop Called")
    }

    override fun onDestroy() {
        super.onDestroy()
        printLog("onDestroy Called")
    }
}
Fot the purposes of this blog, all Android code samples will be in kotlin. After creating the activity file we need to create the XML layout for the activity. Create a file called “activity_main.xml” inside your layout folder and paste the following code:
<?xml version="1.0" encoding="utf-8"?>
<android.support.constraint.ConstraintLayout xmlns:android="http://schemas.android.com/apk/res/android"
    xmlns:app="http://schemas.android.com/apk/res-auto"
    xmlns:tools="http://schemas.android.com/tools"
    android:layout_width="match_parent"
    android:layout_height="match_parent"
    tools:context=".MainActivity">

    <!-- Take a fragment in our activity -->
    <fragment
        android:id="@+id/test_fragment"
        class="me.paixao.androidlifecycle.MainFragment"
        android:layout_width="match_parent"
        android:layout_height="match_parent"
        tools:layout="@layout/fragment_main"
        app:layout_constraintBottom_toBottomOf="parent"
        app:layout_constraintLeft_toLeftOf="parent"
        app:layout_constraintRight_toRightOf="parent"
        app:layout_constraintTop_toTopOf="parent" />

</android.support.constraint.ConstraintLayout>
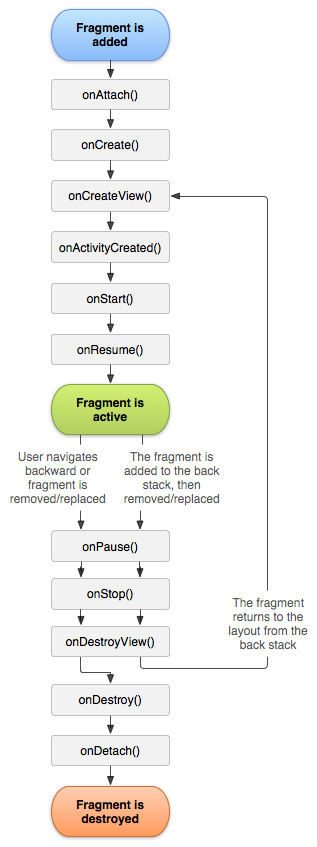
Fragments
To better modularize our code and to build more sophisticated user interfaces for larger screens we make use of the Fragment class. A Fragment represents a behavior or a portion of user interface in an Activity.
A Fragment has a lifecycle of its own, but ultimately always respects the parent Activity’s lifecycle. Meaning, when the activity pauses, all its fragments pause also, when the activity resumes all its fragments resume also. Likewise when the activity is destroyed, all its fragments are destroyed as well.
But this doesn’t necessarily mean that when a fragment is destroyed, the activity is also destroyed. Fragments can also be instantiated later in the lifecycle of the activity.
To compelte your code example and for you to check what happens and when, lets create your first Fragment. Create a fragment called “MainFragment.kt” and copy the following code:
class MainFragment: Fragment() {

    private fun printLog(s:String) {
        // display a message in Logcat
        Log.e("Fragment Lifecycle:", s)
    }

    override fun onActivityCreated(savedInstanceState: Bundle?) {
        super.onActivityCreated(savedInstanceState)
        printLog("onActivityCreated Called")
    }

    override fun onCreateView(inflater: LayoutInflater, container: ViewGroup?, savedInstanceState: Bundle?): View? {
        val v = inflater.inflate(R.layout.fragment_main, container, false)
        printLog("onCreateView Called")
        return v
    }

    override fun onViewCreated(view: View, savedInstanceState: Bundle?) {
        super.onViewCreated(view, savedInstanceState)
        printLog("onViewCreated Called")
    }

    override fun onAttach(activity: Activity) {
        super.onAttach(activity)
        printLog("onAttach Called")
    }

    override fun onCreate(savedInstanceState: Bundle?) {
        super.onCreate(savedInstanceState)
        printLog("onCreate Called")
    }

    override fun onDestroy() {
        super.onDestroy()
        printLog("onDestroy Called")
    }

    override fun onDestroyView() {
        super.onDestroyView()
        printLog("onDestroyView Called")
    }

    override fun onDetach() {
        super.onDetach()
        printLog("onDetach Called")
    }

    override fun onPause() {
        super.onPause()
        printLog("onPause Called")
    }

    override fun onResume() {
        super.onResume()
        printLog("onResume Called")
    }

    override fun onStart() {
        super.onStart()
        printLog("onStart Called")
    }

    override fun onStop() {
        super.onStop()
        printLog("onStop Called")
    }
}
Like the activity, now we need to create a XML layout file for our fragment. Create a file called “fragment_main.xml” in your layout folder and paste the following XML code:
<?xml version="1.0" encoding="utf-8"?>
<android.support.constraint.ConstraintLayout
    xmlns:android="http://schemas.android.com/apk/res/android"
    xmlns:app="http://schemas.android.com/apk/res-auto"
    android:layout_width="match_parent"
    android:layout_height="match_parent">

        <!-- Create a TextView -->
        <TextView
            android:layout_width="wrap_content"
            android:layout_height="wrap_content"
            android:text="@string/check_logcat"
            android:textColor="#000"
            android:textSize="25sp"
            android:padding="16dp"
            app:layout_constraintBottom_toBottomOf="parent"
            app:layout_constraintLeft_toLeftOf="parent"
            app:layout_constraintRight_toRightOf="parent"
            app:layout_constraintTop_toTopOf="parent"/>

</android.support.constraint.ConstraintLayout>
All the strings you want to use in your Android project, should be in a strings.xml file inside your res > values folder. This way we can easily send our strings file to a translator to have our Android project in several languages. Let’s add our first strings in our strings.xml file:
<resources>
    <string name="app_name">Android Lifecycle</string>
    <string name="check_logcat">Please check your logcat in Android Studio, lifecycle messages should be in red.</string>
</resources>
Now we can run our Android project in our Android Studio and check what the Android lifecycle looks like in action. Rotate your screen to see what happens in your logcat (all lifecycle events should look red in your logcat because we defined that all our logs will be error logs).
If you wish to checkout the code directly to avoid copy/pasting, please head to this tutorials github repo here.